Tuesday, April 26, 2011

Faux painting samples by customers

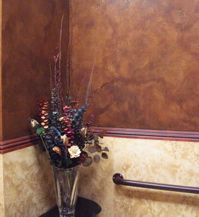
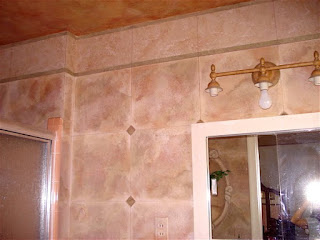
These are just a few samples of pictures and letters I have been blessed with to receive from customers who have bought the patented (7472450) faux painting system the Lord gave me. To view larger image, click on pictures.

My sister and I had an opportunity to fnally use the Triple S Faux in December. It made our job incredibly easy. I'll definitely be using it on more projects.      

Thanks,  
Sherry


Hi Sandra,
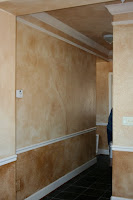


I ordered your painting tools and DVD in order to redo my daughters living room walls.  She had her heart set on the old world parchment look with lots of veins. I have never done any faux painting before but your web site made it look so easy that I gave it a try!
I prayed and prayed that I would be able to make her walls look nice.  Well I am so excited to tell you that IT WORKED!!!
Everyone loves it and my daughter says " mom I catch myself walking upstairs just to look at my pretty walls" !  I look at the painting on the walls and am truely amazed that I did it! Your little poofy pads and palette are wonderful!! I feel so lucky that I found your web site!

I can create all these different faux looks and never fail to be amazed that I did it!  Your video shows exactly what to do,step-by-step. After watching it and practicing on posterboards for about half a day, I was able to paint my first amazing wall! So many people who see my work, want me to do painting for them! I'm still learning but am having fun while I do!
I feel that I have started a profitable career for the price of  $39.99!  Also thanks for being there to answer questions and give suggestions.  You are great and your Triple S faux-painting system is wonderful!

Thank you,
God bless you,
Connie

Hey!  Just wanted to say thanks so much for your wonderful products, we'll be doing another order here again soon.  Attached are some pics of what we've been doing around the house if you can use them.  God bless and thank you so much for honoring Him with your work and website!


Rachel


On January 3rd, 2008 I put my house up for sale.  My neighbor had a couple staying with him whose house burned down 2 months before.  They were not looking to buy at the time, but saw my house and “HAD TO HAVE IT”!

2 months later, they were unable to get financing, so I had an “Open Hose” on a Saturday in March.  3 couple came to look at my house and I had a contract on Monday.  Again, 2 months later, no financing.  This happened for 9 months (4 contracts), Open House…Contract on Monday…No Financing..  Even the couple that I bought the house from 6 years before wanted to buy it back.  Finally, a single women with a large down payment (25%), a good job and a better credit score saw my house and told me she loved everything I did and (again) “had to have it”.
(She bought it for the asking price)

The brickwork in both houses was done with your “Faux Painting Kit”.  After taping off the bricks, I used the “Multi Color Faux Palette” for different color reds, and used the “Poofy Pad” the blend it.

I believe that the painting helped sell my house…

I’ve attached more pix to put in your article (website).

Thanks,
Carla


Monday, April 25, 2011

Patching up another existing faux finish


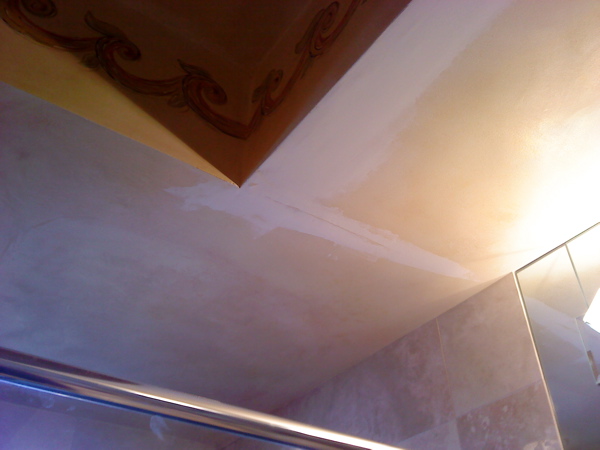
I was asked earnestly to see if I could fix another faux painted wall that had been damaged by water.  I informed the customer that trying to match an existing faux finish was never an easy job.

What made this project even more difficult was that I didn't know what base coat colors the walls were originally painted nor what colors were used for the
faux finishing. In addition, the faux painting technique that was used was not known either.  But praise the Lord, He guided me through the steps I needed to do.  The customer was quite thrilled because I initially told him that it would be nearly impossible to get the areas to match the original faux finish since I wasn't the artist who painted them.
However, after seeing them in person (the customer only explained the problem over the phone), I was more hopeful that I could fix them. There was large areas that had been spackled with joint compound.  None of the areas had been sanded or painted.

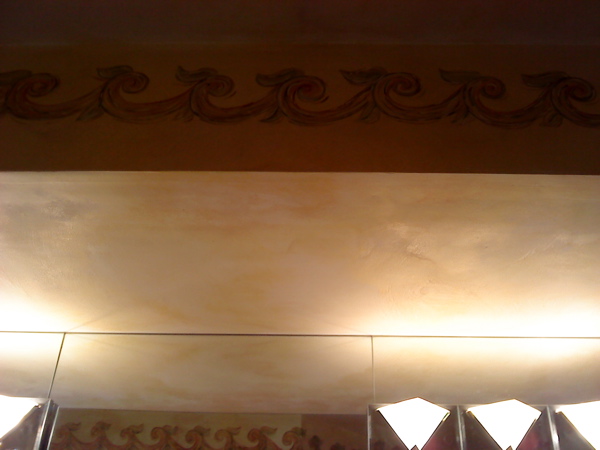
As you can see in the photos, the faux finish was somewhat of an Old World look.  There seemed to be a mixture of faux painting techniques like color washing with a rag of some sort.

So initially I thought I would prime the area and paint it with an off white base coat but after testing a small area, I realized it would not look the same.


The reason was that it seems that the person who originally faux painted the wall, did so on a flat sheen base coat.  The sheen I had was satin, since that is the base coat sheen I usually faux paint with.   After praying a bit and asking for wisdom, I got an idea.  Since I didn't have any flat wall paint with me, I decided to add some white bottled acrylic paint to my colors so that the white would make the paint less transparent. This enabled me to make the section I was fixing blend better with the existing faux finish.

I remembered that once I had done a job where I needed to cover an existing base coat paint because the client hated it.  If I just faux painted over it, the base coat color would still show through. So I did a faux finish color wash but using only paint with no glaze.  That caused the paint I used on top to cover the existing base coat color because the paint was not as transparent because I didn't mix it with a glaze.  This is something you learn quickly when using faux painting glazes.

So I figured I would try to do somewhat of the same thing this time, but I did add a little bit of glaze.  Well, it worked and again, I give all the glory to Christ, who never lets me down.  Since I regularly ask that He alone would open the doors of opportunity to offer my services as a faux finisher, I know that even when it seems impossible, it's not.  Take this tip from me, and learn from a faux painting professional, who has been there, done that!

Monday, March 14, 2011

Patching up a wall painted with a faux finish.

Painter tested out new color for walls on faux finish....argh!
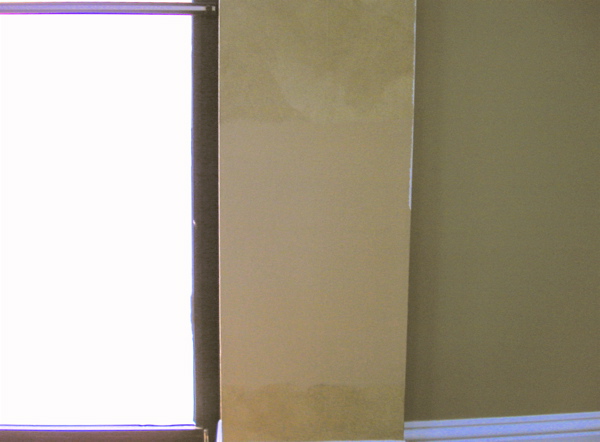
I had faux painted some walls and concrete columns at the church I serve at in an Old World Parchment faux finish.  The base coat I had used was an eggshell sheen.  I used the technique I have developed specifically for faux painting the Old World on Eggshell, since it is different than a satin base coat.  The leaders decided to paint the sanctuary again, leaving the walls that were faux painted as is.  Unfortunately, the painter decided to test out the new color on a couple of the faux painted columns.  I couldn't believe that he did that.  In addition, there were areas that were damaged due to moisture and they had to patch them with spackle.  I was asked faux paint the areas to match the original faux finish I had done.  "What a challenge" I said to myself.  "This is really going to be fun".

Sometimes it is actually easier to faux finish a whole wall over again than it is to patch an area.  The reason is that the edges tend to look harsh and you can see where the wall was patched up.  However, to paint these columns all over again would take time. To make matters more challenging, I didn't have the original paint that I had used to mix my glaze, either.  The reason being was that I had done the faux finishing many years ago, when I didn't do very much faux painting. Another person was in charge of the project and they bought the paint to mix the glaze and neither of us wrote the color down.

Well, praise God, after praying (which is the Most Important Faux Painting Tip) and relying on the wisdom I received, I am so happy to say that I believe the patch work was a success.  The pastor was very pleased and most cannot tell that there was any fixing done in the first place.

First I painted the patched area with a satin base coat that was similar to the original, since the church didn't have the original can. I left a ragged edge where it butted up to the faux finish that remained intact.  I did the same for the side of the column where the spackle was used.  Usually I would prime the area first but I didn't need to this time.

Next, I mixed my glaze and after pressing the poofy pad onto the palette, I pounced the color on the base coat, carefully blending the edges as best as possible.


It did one more layer of glaze to get the right intensity. I did have to add just a tad of another color on top to get the perfect color.  It took less time than I expected.

Finished patch of Old World Faux 
One thing I had to keep in mind was that the color does darken once the glaze is dry, so even though it seemed super light at first, I only had to add one extra layer.

There was a total of 3 columns that I had to fix and I have included before and after picture of 2 of the columns I had to patch up.  As you can see, the match was very close.  Pictures never do justice and I have to admit that in person, the patch work looks very similar to the original Old World Parchment I did.


Wednesday, February 16, 2011

Progress - Faux Painting projects, contd.


French doors with faux wood finish 
Faux Wood DVD 
A got a request to faux paint another double garage door and a set of french doors. It couldn't have come at a better time since I am working on the Faux Wood DVD that I pray, by the grace of God, will be available this year.  As with any job, there are always new challenges.  I had never did a faux wood finish on french doors with oval glass fixtures in them.  I am so glad that I have not limited myself to using the wood graining tools that you have to rock to get the grain. With the limitation of space, I would never have been able to get the tool to work.  

Working in the sun was not too bad at this time of year, early February.  The last time I faux painted doors like wood, it was in the late summer and it was a killer.  I realized while doing that job that using the flat brushes to get the grain was not working either. The main reason being that the sun was drying out the glaze about 2 minutes after applying it!  There was zilch open time. I was getting a blotchy look, too. Although real wood has a variety of darks and lights, the rich look of mahogany or beech wood was being lost.  I admit that I was overwhelmed with the predicament to finish the job with excellence, yet not take days to fix the problem of the blotchiness. So as usual, by the grace of the Holy Spirit, I prayed and asked for wisdom and HELP.  God is so good...He answered as usual.  

To my amazement and delight, I achieved the faux wood finish using just the Multi Color Faux Palette and Poofy Pad; hitting the edges with a chip brush.  I even added the grain and knots with the Poofy Pad.  God does work all things for good to those who love Him, even non-calculated decorative painting problems....lol.  

So with this last job, I finished in record time.  Both the double doors and double french doors were done in one day.  Of course I am referring to the time spent with the faux finishing technique, not including the additional time to base coat paint the surfaces with environmental friendly paint.  

Unfortunately, with this great discovery, I have to add an additional video section to the DVD that shows how to faux paint doors in the sun as opposed to what I have filmed for painting cabinets or inside doors.  In addition, since some people like a lot of heavy looking grains or knots in their faux wood, I am praying about a new tool that the Lord gave me, to achieve this without the difficulty of using the wood graining tool that exists....even if it does rock...lol

Wednesday, December 29, 2010

What's in store for 2011 with faux painting?

With 2011 around the corner, I am excited about the new faux finishing DVDs that should be available to my customers.  I apologize for the long wait.  Since I like trying out a technique myself on real walls before I create a step by step instructional on it, it does take time.  Once I see a difficulty, whether it be with open time, getting into tight spaces or doing the corners, I set out to find the solution.  Those who have read some of my other articles or read about Murals and Faux Painting, realize the importance I put on making it easy for everyone to DIY.  I want others to learn from a faux painting professional that has "been there, done that"in order to save them the trouble I went thru when I started out.

Faux Wood DVD
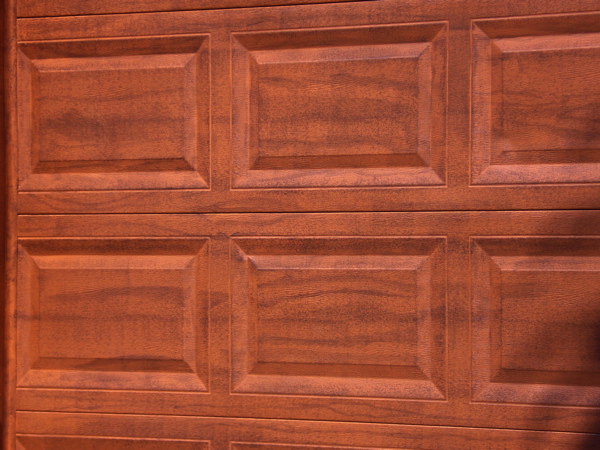
Garage door faux painted like wood
Using faux painting to make surfaces look like wood has always been popular.  I hope to have a DVD that will teach a simple faux finishing technique I have developed, again by the help of Almighty God, to achieve a faux wood look.  Using the same tools of the patented (7472450) Triple S Faux System, like the Poofy Pad and Multi Color Faux Palette, I was able to simplify the way I have faux painted garage doors to look like real wood in the past.  What had kept me from producing the instructional DVD for it was that I wanted to be able to recommend a good top coat varnish or sealer to add to the finish.  With certain products not available in the stores, I wanted to use a product that any of my customers can order online from another company or thru my website.  I think I have narrowed down the choices to two products.

Faux Texture DVD
 Texture was added and faux finished for back splash 
Another popular faux finishing technique is adding texture to surfaces before faux painting them.  There are a few methods out in the market but they tend to use only specific products that usually require having to take a class in order to be able to purchase them.  In addition, some require the usage of bulky equipment.  I love simplicity and less mess and some methods of adding texture with a spray gun require having to cover all the furniture because of the over spray.

Right before Christmas, I was able to add a back splash using a new technique that is similar to skip troweling but without the trowel.  Most of the techniques use the Tuck and Gather Tool which is one of the tools in the system I have developed.

Faux Granite DVD
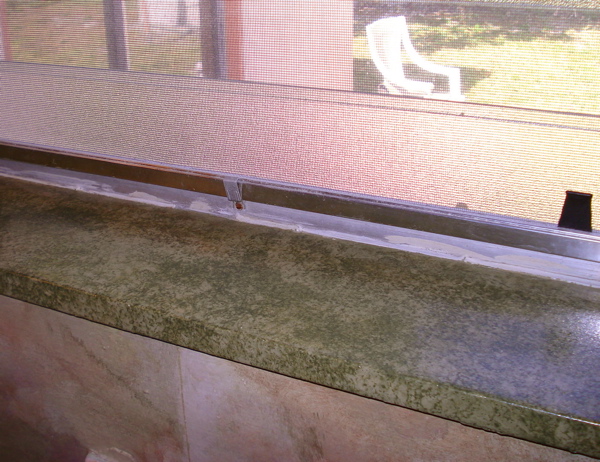
Window sill with faux granite finish
And lastly, I have faux painted counter tops to look like faux granite.  The techniques I have used are simple ones and I am still in the process of playing with new tools I would like to produce to make it even easier to get a real granite look. I have used glitter and mica flakes to create gorgeous faux finishes but again, I am still working on the step by step instructions that will be easy to follow.

So if you happen to be a prayer warrior, please pray that I will be led by the Spirit when and how to produce these highly requested DVDs. I don't want to miss what I should be doing as far as serving the Lord goes and discerning how to manage my time has always been a challenge for me.  If you have any comments, please leave them or contact Murals and Faux Painting and drop me a line.


Wednesday, December 1, 2010

NEW! Send questions about your faux finishing project

We get calls with questions concerning particular faux finishing topics like what faux painting techniques are best to use on certain walls, what colors should be used, etc.  So I decided to add a section on my website where customers can submit their questions.  I really do like taking the time to answer as many questions as possible.  I appreciate all my customers and have a sincere desire to see them succeed in their decorative painting projects or careers.

I realize that getting quick answers is critical these days with lives being so busy.  Patience is not a virtue that many seek, either.  So I apologize if my website has many pages and is in any way difficult to navigate.  Constructive criticism is always welcomed. If you feel I can make the site easier, please feel free to give me your suggestions.  Especially if you find any broken links or 404 Not Found pages, too.

So go to this page where you can click on a link to send me a letter with your questions or comments. 

If I decide to post the question, I will not include any personal information and you can always leave off your last name, too.

Although I cannot promise to answer immediately, I will make time to do so within a few days.  If you want to send me a letter, please know that I value your privacy and will never sell your email address to anyone.  You can read our privacy letter by clicking here: 

I have tons of information about many different aspects of faux painting on my website and on this blog. In addition, you can find more areas of discussion on my Facebook page, too.  

I have also made a video answering the 3 most popular questions about faux painting that I get.


Saturday, October 23, 2010

Should you start your own faux painting business?

I recently gave a class to a gentleman that was looking to not only learning the art of faux painting but also wanted to know how he could start his own decorative painting business.  Since he was totally new to this market, I gave him as much advice as I could.  In deciding what to blog about next, I thought it would be a good idea to submit an article I have written for some ezine publications as well as a new Google Knol I wrote.  The article is similar to the one I have on my website, too.  I look to adding to this post in the future with additional information and tips.  I welcome any other advice from professional faux finishers that can help newbies get started with their own faux painting business.


How much money can one expect to earn?
Just to give you an idea of how much you can earn starting your own business, I charge $2.25 - $8.00 per square feet. With the patented (7472450) Triple S Faux System that the Lord gave me,  I can faux paint a wall that measures 10 ft. high X 10 ft. long (100 square feet) in about 2 hours.  You can do the math.  Most faux painting professionals are charging an average of $3.00 per square feet for simple faux painting finishes.  They charge about double of that for adding a texture to the wall or for sophisticated plaster finishes.  If you are starting out, I would suggest charging about $1.50 a square foot so you can land some jobs (beat out competitors) and then once you gain popularity or word of mouth reputation, up your price.


What tools should you use?
The wonderful thing about embarking on your own journey into the beautiful art of decorative painting today is that there are a lot more faux painting tools, faux finishing classes, and books available than there was when I started out ten years ago.  My suggestion is to start out with the simple faux finishes such as sponging and color blending.  There are many textured faux finishes that you can learn but they are time consuming and the materials can be quite expensive.  After faux painting literally hundreds of walls, I can tell you honestly that 90% of my clients still choose “color blending” or “color washing”, including the “Old World Parchment” look.  Why, because some of the textured faux finishes are too “busy looking” and the cost for faux painting with texture is nearly double than what it is for non-textured faux finishes.  Besides, once you get your foot into the door, then you can offer them.


How I started my faux painting business
I never dreamed that I would be in the business of Faux Painting or Decorative, considering I was a graphic artist by trade. The thought never crossed my mind. I was unaware of how popular this beautiful form of art was becoming, though.  Back in 1996,  there was only limited information on the various faux painting techniques.  Most referred to faux finishing as “sponging” or “glazing”.  In essence, the term was misused and for the most part, still is.  I am referring to the fact that “FAUX” means “FAKE”, therefore, to faux paint a wall means to paint it in a way that makes the wall resemble a specific surface other than just a plain wall, such as “marble”, “wood”, etc.  The sponges or glazes are just tools to achieve a certain effect on the wall.  I’ve read comments on faux painting message boards indicating the perturbation of professional faux finishers when uninformed clients refer to any type of decorative painting (besides murals) as “fauxing”. It used to bother me, too, yet through the years I’ve learned to accept the fact that those unfamiliar with the details of faux painting could care less about the terminology and more about the beauty of decorative painting instead.  So although you have not been professionally faux painting walls, if you learn how to achieve a few easy faux finishing techniques, you can offer your services to friends and family and they won’t care if you’re uninformed with the terms.  As long as you can make their walls look beautiful, you can make some extra income on the side.  Who knows - maybe you’ll end up with your own faux painting business like I did. Start off by painting your own walls, then invite others to see your work.  If they ask how much would you charge to faux paint their walls, give them a relatively low price since you are just starting out and use it as practice.  If you ever plan to start your own faux painting business, you can get quite a few “practices” in and you can begin gathering photos for your portfolio. That’s how my journey began. 

Tuesday, December 22, 2009

Faux Paint Tub as Marble Stone


Well, praise God, the tub I faux painted as Marble Stone passed the test!
I painted this tub that was in bad shape 2 years ago and although it held up, since I painted it a solid beige, it looked boring. Since it started to chip around the drain, I decided to add some texture to it and faux paint it to look like a honed marble stone tub. I let it cure for a month and yesterday my family was down for Christmas and used it. That was going to be the test, to see if it held up to 15 people using it! Well, it did! I am so blessed cause it looks great and is functional, too. My family really liked it, too.

I will be adding a page to my website that will include a new Faux Painting DVD that I want to produce, Faux Painting Texture. I need to get the video done and ask that any believers in Jesus out there, will pray for wisdom from the Lord to produce it in a way that as always, will make it easy to learn faux painting.

Merry Christmas to all who are reading this post!

Friday, September 11, 2009

Faux Painting Tile Project

Bathroom wall painted with faux tile finish in 3 colors

With a faux painting web site to keep up with, I don't have much time to do as many projects as before. Don't get me wrong, I still continue to actually faux paint for profit, but when I refer to projects, I mean my own where I do it for loved ones or for fun. Recently, my mom changed her toilet and now she didn't want the green faux finish I had done many years ago. So I wanted to bless her by taking my time to do a "trompe l'oeil" effect. That's fancy french which means, "trick of the eye". I love the look of tile in a bath but installing real ones is not only expensive, but the mess it creates is not pleasant. I have been in homes where there is tile being installed and the owners can't wait to get the job done. There's a lot of dust from the concrete in the air where they mix the powder they need. Anyway, I figured painting the tile would eliminate the mess and in the future, if my mom wants to change the look, she doesn't have to mess up the walls to take out the old tile. In addition, we could still use the bathroom while I was working, plus, she saved so much money and time, looking for the perfect color in tile.

Well, here's a picture of what I did. And yes, I used the Triple S Faux Painting System that God gave me. I cannot faux paint without this patented system, myself. I do plan to make a video of the steps I took and all the faux finishing techniques I used to achieve this beautiful look. I sent this picture out to my friends and asked them what they thought of my tile work and none of them thought it was paint; they all thought the tiles were real. So I guess I passed the test. Thank you Lord for my first "trompe l'oeil" attempt being a success. At least I think so. What do you think? I would love comments.

Friday, April 24, 2009

Example of faux painting by done by a customer


Well, gotta be quick cause I gotta get to bed. Not late at all but I need to get back into the habit of spending some quiet time with the Lord and more time reading the bible. God's been too good to me to stray from seeking Him.

Anyway, tonight I was blessed to see that I got a lot of visits to my website and was particularly curious about a referred site I didn't recognize. So I went to visit it and I was pleasantly surprised to see that a customer had posted some pictures of her faux painting project on her site. I needed to put her pictures on my testimonies' page but haven't the chance yet. I was working on new tools and new faux painting techniques most of the day in addition to giving a quote for a big job.

So I decided to quickly post my customer's picture on this blog so that I can get others to see it. Her walls came out gorgeous and especially the ones I am including on this post. I am including a bit of her letter, too. It's customers like Amanda that make it all worth while and the Lord uses people like her to encourage me to keep going. He knows I would rather be sharing a bible study or visiting orphans and widows but for now, until the time is right, I will stay with the talent He has blessed me with. I love art and I love seeing others succeed in their quest to learn how to faux finish. I hope you like the pictures of Amanda's faux painted walls. Here's a few words she wrote me:

Hi! I emailed you way back about those annoying knockdown walls that are all through my house, and I subsequently bought rather a lot of faux painting supplies from you to take care of that little problem. I thought I would show you that I've been putting them to great use! It's been slow but sure progress, and it's turned out beautifully. I still have three rooms left to do, but I can't wait to show you any longer.

Just today I finished my studio. It's my favorite so far and I HAD to email you and show you that I really have the hang of it now. I know there are a lot of pictures, but I think you'll agree it looks lovely.

If you want to put any of these up on your site, please, feel free! I AM an artist, but I'll tell you that the only time my artistic talent ever came into play was in choosing colors. That was the hardest part. Everything else was so EASY. I think most anyone could pick up the knockdown technique in about twenty minutes. Even painting the ferns was simple. (I did that with a brush, but I gently went over them with a small poofy pad to blur them and break up darker blobs of paint. Not a perfect job, because I was learning as I went, but let me tell you, you step back three feet and any "mistakes" do not show at all.)

I am so happy, and so grateful for your wonderful inventions. This would not have been possible without them, and without you. Everyone who sees what I have done asks how I did it, and everyone who asks gets pointed straight at your site. It's the least I can do.

Thank you from the bottom of my heart.

Best always,

-- Amanda Gannon